Easy Frozen Strawberry Shortcake Ice Cream Bars For Summer Parties
My kids started requesting these the week school let out, and I have made them on repeat every June since.
The active work is about 15 minutes. You mix, press, pour, and walk away. The freezer does everything else.
Easy Frozen Strawberry Shortcake Ice Cream Bars For Summer Parties
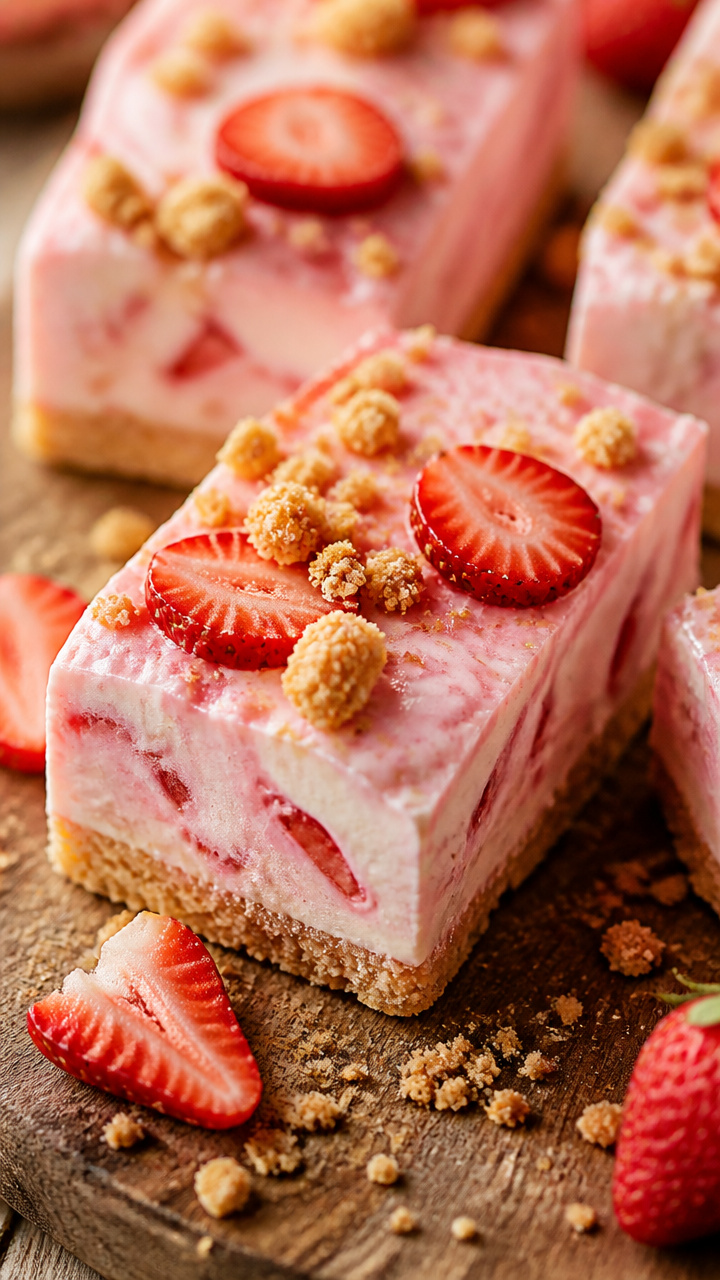
Creamy strawberry ice cream layered onto a buttery shortcake crust, frozen into handheld bars that disappear faster than you can plate them.
Ingredients
Shortcake Crust
- 2 cups golden Oreos or shortbread cookies , finely crushed
- 4 tbsp unsalted butter , melted
- 1 tbsp granulated sugar
Strawberry Ice Cream Layer
- 2 cups fresh strawberries , hulled and diced
- 2 tbsp granulated sugar
- 2 cups vanilla ice cream , softened at room temp for 10 minutes
- 1 cup heavy whipping cream , cold
- 2 tbsp powdered sugar
- 1 tsp pure vanilla extract
Topping
- 1 cup fresh strawberries , sliced thin for topping
- 1/2 cup golden Oreos or shortbread cookies , roughly crushed for topping
Instructions
Tips & Notes
- Soften the ice cream on the counter for exactly 10 minutes before you start. Too soft and it will make the bars icy. Too hard and it tears the whipped cream.
- Crush the cookies in a zip-top bag with a rolling pin rather than a food processor. You get better texture variation and one fewer dish.
- For the cleanest bars at a party, slice them while still fully frozen and return them to the freezer on a parchment-lined sheet pan until 5 minutes before serving.
- If fresh strawberries are not at their peak, a 10-ounce bag of frozen strawberries thawed and drained works just as well in the filling.
Nutrition per serving · estimated


Why The Crust Matters More Than You Think
A soggy bottom is the only real failure mode here. Pressing the crust firmly and pre-freezing it for 10 minutes before adding the filling keeps it distinct and slightly crunchy even after days in the freezer.
The butter ratio in this crust is intentional. Too little and it crumbles when you lift the bars. Too much and it turns greasy after freezing. Four tablespoons hits the exact point where it stays together without feeling heavy.
Making These Ahead For A Party
These bars are genuinely built for making ahead. I usually make them the night before and slice them the morning of the party, then store the sliced bars on a parchment-lined sheet pan covered with plastic wrap.
Pulling them out 5 minutes before guests arrive gives you that perfect texture, firm enough to hold but soft enough to bite without effort. Anything longer and they get drippy in summer heat, especially outdoors.