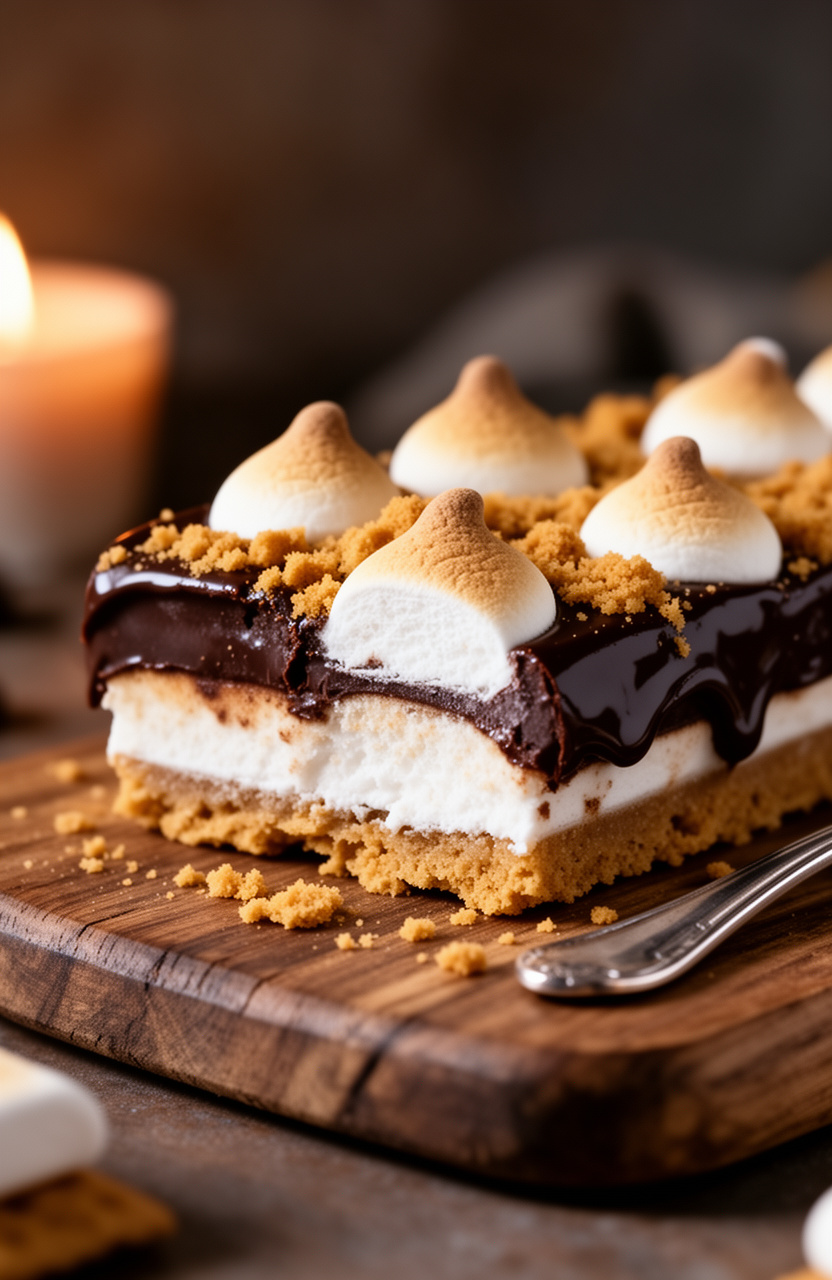
Party-Ready Frozen No-Bake S’mores Bars (No Campfire Needed)
Every summer, my family does a big backyard cookout, and s'mores are basically non-negotiable. The problem is juggling marshmallows on sticks while also trying to hold a conversation — so a few years ago I started making these frozen s'mores bars instead, and honestly, nobody misses the campfire.
They come together with no oven, no flame, and no fuss. Just a handful of pantry staples, a little melting and layering, and your freezer does the rest.
Party-Ready Frozen No-Bake S'mores Bars (No Campfire Needed)
All the gooey, chocolatey campfire magic of s'mores packed into a freezer-friendly bar you can make days ahead.
Ingredients
Graham Cracker Crust
- 2 cups graham cracker crumbs , from about 14 full crackers
- 6 tbsp unsalted butter , melted
- 3 tbsp granulated sugar
Chocolate Fudge Layer
- 2 cups semi-sweet chocolate chips
- 1 cup heavy cream
- 2 tbsp unsalted butter
- 1 tsp pure vanilla extract
Marshmallow Layer
- 3 cups mini marshmallows , divided
- 2 tbsp unsalted butter
- 1 cup marshmallow fluff , also called marshmallow creme
- 1 pinch salt
Topping
- 1 cup graham cracker crumbs , for sprinkling
- 0.5 cup mini marshmallows
- 0.25 cup chocolate chips , optional, for drizzling
Instructions
Make the Crust
Make the Chocolate Fudge Layer
Make the Marshmallow Layer
Add the Toppings and Freeze
Tips & Notes
- For the cleanest slices, run your knife under hot water, wipe it dry, then cut. Repeat between each cut.
- These bars are best served slightly thawed u2014 pull them from the freezer 5 to 10 minutes before serving so the marshmallow layer softens just a little.
- Want a toasted marshmallow flavor? After plating individual bars, use a kitchen torch to lightly toast the marshmallows on top. It takes 10 seconds and people absolutely lose their minds over it.
- Use dark chocolate chips instead of semi-sweet for a more intense, less sweet bar u2014 pairs really well with the marshmallow layer.
- If your marshmallow layer is too stiff to spread, warm it for an extra 30 seconds on very low heat and stir gently before pouring.
- Make sure your ganache layer is fully set before adding the marshmallow layer or you will get them mixing together at the edges.
Nutrition per serving · estimated
Why These Are My Go-To Party Dessert
The best thing about these bars — aside from the obvious fact that they taste like a perfect s'more — is that you can make them two or three days before your party and just pull them out when you need them. No last-minute baking, no melted frosting disasters in summer heat, no standing over a stove while your guests arrive.
They also travel surprisingly well if you keep them in a cooler. Bring them to a potluck, a pool party, or a school event, and they hold their shape far better than you would expect from something this indulgent.
Getting the Layers Just Right
The only real trick here is patience between layers. The ganache needs those 30 minutes in the freezer to firm up enough that the warm marshmallow layer doesn't sink straight through it. Skipping that step is the one thing that can make these bars look less than perfect, so set a timer and walk away.
The marshmallow layer itself is thick, sticky, and a little stubborn — an offset spatula or a butter knife dipped in warm water makes spreading it much easier. Don't stress if it looks a little rough on top because the graham cracker crumb topping covers everything beautifully.